How to Create a Pinterest Business Account
Pinterest isn't just a social network — it's a visual discovery engine. People come to Pinterest to search for ideas, plan purchases, and find inspiration. A Business Account gives you analytics, Rich Pins, and advertising tools to turn that intent into traffic for your brand.
What you'll need before you start
- An email address (one you check regularly)
- Your business name
- Your website URL
- A logo or profile image (165×165 px minimum)
- An idea for your first board (a topic related to your business)
10 steps to set up your Pinterest Business Account
Go to Pinterest Business signup
Open your browser and go to pinterest.com/business/create/. This is the direct signup URL for business accounts. Don't use the regular Pinterest signup page — the business version gives you analytics, advertising tools, and Rich Pins from the very start.
Enter your account details
Enter your email address, create a password (at least 6 characters), and enter your age. Use an email you check regularly — Pinterest will send you analytics summaries and important account notifications here.
Fill in your business name
Type your business name exactly as you want it to appear on your profile. This is what people will see when they visit your Pinterest page or find your pins in search results. Use your actual brand name — not a keyword-stuffed version. For example, use "Pine & Oak Furniture" not "Best Cheap Furniture Store Buy Now."
Add your website URL
Enter your full website address, including https:// (for example, https://www.yourbusiness.com). You'll verify this website later in Step 10 to unlock additional features. If you don't have a website yet, you can skip this for now and add it later in your profile settings.
Select your business type and description
Pinterest will ask you to pick the category that best describes your business. Choose from options like:
- Brand — if you sell products or run an online store
- Retailer — if you have a physical or online shop
- Professional — if you offer services (consultant, designer, coach)
- Publisher / Media — if you create content (blog, magazine, news)
- Other — if none of the above fit
Then briefly describe what your business does. Keep it simple — something like "We design and sell handmade candles" or "Digital marketing agency specializing in small businesses."
Choose whether you want to run ads
Pinterest will ask if you're interested in running ads (Promoted Pins). This is completely optional. If you're not sure, select "I'm not sure yet" or skip this step entirely. You can always set up advertising later from your account settings. Most businesses start with organic content first and only run ads once they understand what content resonates with their audience.
Almost there!
Your Pinterest Business Account is almost ready! Here's something worth knowing: Pinterest is unique among social platforms — pins have the longest shelf life of any social content. A single pin can drive traffic to your website for months or even years after you publish it. SocialBotify generates keyword-rich pin descriptions that help your content get discovered in Pinterest search. Try it free for 7 days.
Upload your profile photo or logo
Click the profile photo area and upload your business logo or a professional headshot. The minimum size is 165 × 165 pixels, but aim for at least 600 × 600 px for a crisp result. Pinterest will crop the image into a circle, so make sure your logo or face is centered and nothing important gets cut off at the edges.
Write your "About" section
Go to your profile and click Edit Profile. In the "About" field, describe what your business does and who it helps. This is important because Pinterest is a search engine — the keywords you use here help people find your profile.
Include keywords that your target audience might search for. You have up to 500 characters, so use them wisely.
Create your first Board
Boards are how you organize your pins by topic. Click the + button on your profile, then tap Create Board. Give it a clear, descriptive name related to your business.
Name examples by industry:
- Contractor: "Kitchen Renovation Ideas"
- Bakery: "Wedding Cake Inspiration"
- Real estate: "Modern Home Staging Tips"
- Fitness coach: "At-Home Workout Routines"
- Marketing agency: "Social Media Tips for Small Business"
Add a board description with relevant keywords. This description helps Pinterest understand what your board is about and show it to the right people.
Claim your website
This is the most important setup step for driving traffic. Go to Settings (click your profile icon, then the gear icon) and find Claim in the left sidebar. Enter your website URL and Pinterest will give you three verification options:
- Add an HTML tag to your website's <head> section (easiest if you have access to your site's code)
- Upload an HTML file to your web server's root directory
- Add a DNS TXT record through your domain registrar (best if you don't want to touch your website code)
Pick whichever method is easiest for you, follow the instructions, then click Submit. Verification usually happens within a few hours but can take up to 24 hours.
Your Pinterest Business Account is ready!
Now let's optimize your profile to get the most out of Pinterest.
Optimize your Pinterest profile for maximum reach
A Pinterest Business Account is just the start. These optimization strategies will help your pins reach more people and drive consistent traffic.
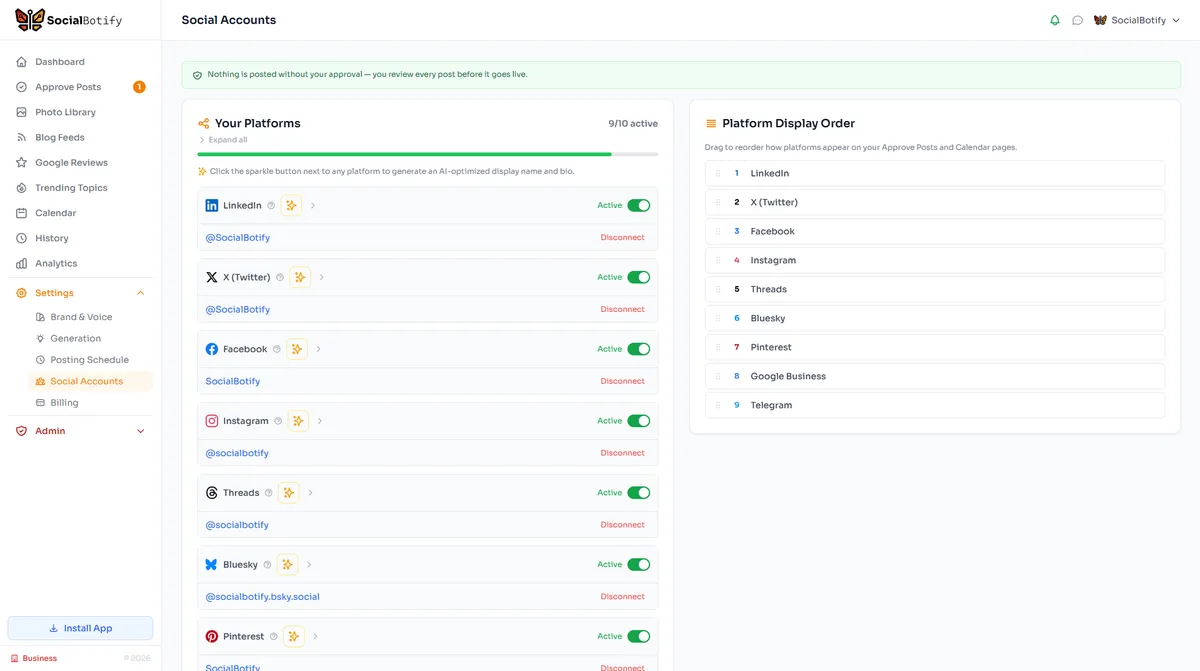
Board organization strategy
Think of your boards as categories in a store — they should be clearly labeled and logically organized. Here's how to structure them:
- Start with 5-10 focused boards that cover your main topics. You can add more later.
- Put your most important board first. Drag and drop to reorder boards on your profile. The first row is what visitors see immediately.
- Use keyword-rich board names. "Holiday Gift Ideas Under $50" ranks better than "My Favorites."
- Write board descriptions with 2-3 sentences that include natural keywords. Pinterest indexes these for search.
- Set a board cover image for each board. Choose a visually strong pin that represents the board's theme.
Enable Rich Pins
Rich Pins automatically sync information from your website to your pins. There are three types:
- Article Pins — show the headline, author, and description from your blog posts
- Product Pins — display real-time pricing, availability, and where to buy
- Recipe Pins — include ingredients, cooking time, and serving size
How to enable Rich Pins:
- Add Open Graph meta tags (og:title, og:description, og:image) to your website. Most CMS platforms like WordPress already do this.
- Go to Pinterest's Rich Pin Validator (developers.pinterest.com/tools/url-debugger/)
- Paste a URL from your website and click Validate
- If everything looks correct, click Apply. Once approved, all pins from your website will automatically become Rich Pins.
Keyword optimization (Pinterest is a search engine)
Unlike Instagram or Twitter, Pinterest works more like Google than a social feed. People actively search for things on Pinterest. This means keywords matter — a lot. Here's where to include them:
- Profile name — add a keyword after your brand name (e.g., "Pine & Oak | Modern Furniture Ideas")
- About section — naturally weave in terms your audience searches for
- Board names and descriptions — use specific, searchable phrases
- Pin titles — descriptive titles that tell people exactly what they'll find
- Pin descriptions — 2-3 sentences with relevant keywords (no hashtag stuffing)
Pin design tips
The visual quality of your pins directly impacts how many clicks and saves you get. Follow these guidelines:
- Use a 2:3 aspect ratio — the ideal pin size is 1000 × 1500 pixels. This is the format Pinterest is optimized for.
- Add text overlays — pins with readable text perform better because people can understand the content at a glance while scrolling.
- Use high-quality images — blurry or pixelated pins get ignored. Bright, well-lit photos stand out.
- Keep branding subtle — add your logo or URL in a small corner. Pinterest isn't the place for giant watermarks.
- Design multiple pins per piece of content — create 3-5 different pin designs for each blog post, product, or page. Different visuals appeal to different people.
Plan seasonal content ahead
Pinterest users plan ahead — they search for holiday ideas in October, summer outfits in March, and back-to-school content in June. To catch these waves of search interest:
- Post seasonal content 30-45 days early. If you're promoting Valentine's Day gifts, start pinning in early January.
- Create evergreen boards that stay relevant year-round (tips, how-tos, inspiration).
- Check Pinterest Trends (trends.pinterest.com) to see what's rising in your category.
- Batch-create seasonal pins so you're not scrambling before each holiday or season.
Stay consistent without the daily grind
Pinterest rewards fresh content — the algorithm favors accounts that pin consistently rather than in bursts. Instead of manually creating and scheduling pins every day, SocialBotify generates keyword-optimized pin descriptions tailored to your boards and industry. Set it up once, review weekly, and let your Pinterest presence grow on autopilot. Start your free 7-day trial.
Frequently asked questions
Ready to start posting on Pinterest?
Let SocialBotify handle your Pinterest content. AI writes posts in your brand voice, you review them once a week, and they publish automatically. 5 minutes a week instead of 5 hours.
Start your free trial →7-day free trial · No credit card required · Cancel anytime